So, I’ve been wanting to make a basketball court diagram for a while now. It’s something I’ve seen people do, and I thought, “Hey, I can do that too!” So today, I finally decided to give it a shot.
First off, I grabbed a big piece of paper and a pencil. I mean, you gotta start with the basics, right? I figured I’d sketch it out roughly first before going all in with markers or whatever. Then I started to draw the outline of the court. It’s basically a big rectangle, so that part wasn’t too hard. Just had to make sure the lines were kinda straight. I used a ruler for that, ’cause my freehand drawing skills are, well, let’s just say they’re not exactly pro-level.
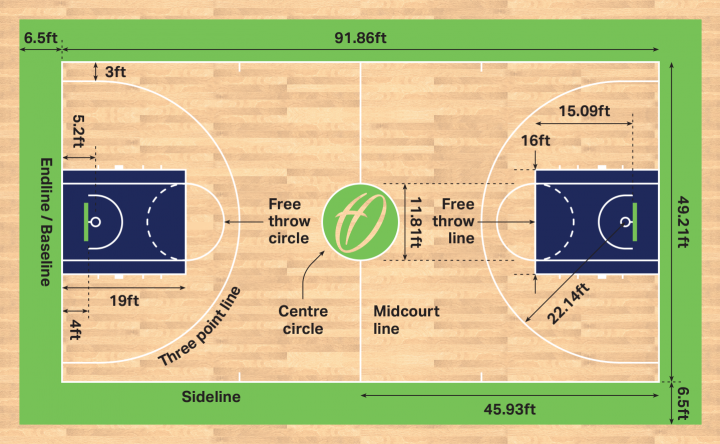
Then came the fun part – adding all the details. I drew the center circle first, followed by two larger circles at the center of each half of the court. After the circles, I drew a line straight across the middle of the whole thing, splitting it into two halves. That’s the half-court line. It divides the whole rectangle in half. Next up were the free-throw lines and the lanes. Those are the rectangles that go from the baseline to the free-throw line. I tried to make them look like the ones I’ve seen on TV, but I don’t know. Mine looked a little wonky, but hey, it’s all good.
My Drawing Steps
- Drew the outline: Made a big rectangle with my trusty ruler.
- Added the center circle: A small circle in the very middle, with a larger circle on each side of the center of the court.
- Drew the half-court line: Split the rectangle in two, right down the middle.
- Drew the free-throw lines and lanes: Made those rectangles that lead up to the free-throw line.
- Added the three-point lines: Those are the arcs, and honestly, they were the hardest part.
- Drew the restricted area arcs: Added the semi-circles below the baskets.
- Drew the sidelines and baselines: Made sure those were nice and thick.
The three-point lines were a real pain. I had to look up a picture online to figure out how far they were supposed to be from the basket. I ended up using a makeshift compass – a string and a pencil – to draw those arcs. They’re not perfect, but I think they get the job done. Also, I made these little semi-circles under the baskets. I’m pretty sure they’re called the restricted area arcs, or something like that.
After I was done with all the lines, I went over everything with a black marker to make it stand out more. I even colored in the lanes to make them look a bit more realistic. I might add some more details later, like the team names and stuff, but for now, I’m pretty happy with how it turned out. It’s not exactly NBA standard, but it’s my own little basketball court diagram, and that’s what matters. All in all, it was a fun little project. It took me a few hours, but it was worth it. Now I can use this diagram to plan out plays, or just stare at it and dream about hitting game-winning shots. Who knows, maybe I’ll even get a real basketball court someday. A guy can dream, right?